Learn how to use TensorFlow.js and Automated Machine Learning (AutoML) to prototype a computer vision model, plus increase the efficiency of manual data labeling.
Learn how to use TensorFlow.js and Automated Machine Learning (AutoML) to prototype a computer vision model, plus increase the efficiency of manual data labeling.
Introduction 👋
Data collection and preparation are the foundation of every machine learning application. You've heard it before: "Garbage in, garbage out" in reference to an algorithm's limited capability to correct for inaccurate, poor-quality, or biased input data.
The cost of quality annotated data prompted a cottage industry of tools/platforms for speeding up the data labeling process. Besides the SaaS/on-prem startup ecosystem, each of the major cloud providers (AWS, Microsoft, Google) launched an automated data labeling product in the last two years. Understandably, these services are often developed with Premium/Enterprise users, features, and price points in mind.
On a limited budget, am I stuck labeling everything by hand?
Good, news! With a bit of elbow grease, you can automate bounding box annotation for yourself or a small team. In this blog post, I will show you the automation technique I used to quickly prototype a 3D print failure detection model.
You'll learn how to:
- Create detailed instructions for human labelers
- Train a guidance model
- Automate bounding box annotation with Microsoft VoTT (Visual Object Tagging Tool) and TensorFlow.js
Pictured: Custom TensorFlow model automatically annotates a video frame in Microsoft VoTT (Visual Object Tagging Tool).
First Annotation Pass 🏷
If you're starting from scratch without labels, you do need to bite the bullet and annotate some data manually. Labeling at least a few hundred examples by hand is required to create written guidelines and evaluation criteria for annotation decisions.
Install VoTT (Visual Object Tracking Tool) from Source
Microsoft VoTT is an Open Source tool for annotating images and videos with bounding boxes (object detection) and polygons (segmentation). I use VoTT because it supports a variety of export formats, can be hosted as a web app, and lets me load a custom TensorFlow.js model to provide bounding box suggestions.
Prerequisites:
- NodeJS (>= 10.x) and NPM.
I recommend NVM (Node Version Manager) to manage NodeJS installation and environments.
$ git clone https://github.com/microsoft/VoTT
$ cd VoTT
$ npm ci
$ npm i @tensorflow/tfjs@2.7.0
$ npm startRefer to Using VoTT to create a new project and setup data connections.
Looking for a dataset? Try Google's Dataset Search.
Manually Label Some Examples
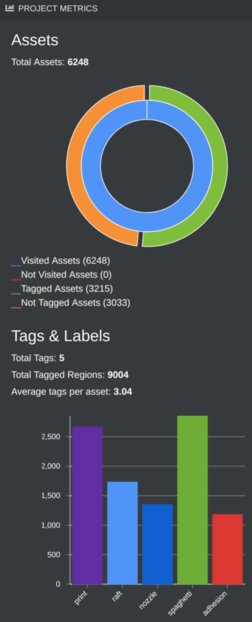
The number of images you'll need to label by hand depends on the problem domain, ranging from a few dozen images to thousands. I obtained reasonable results for my problem (detecting 3D print defects) with:
- 5 labels (distribution below)
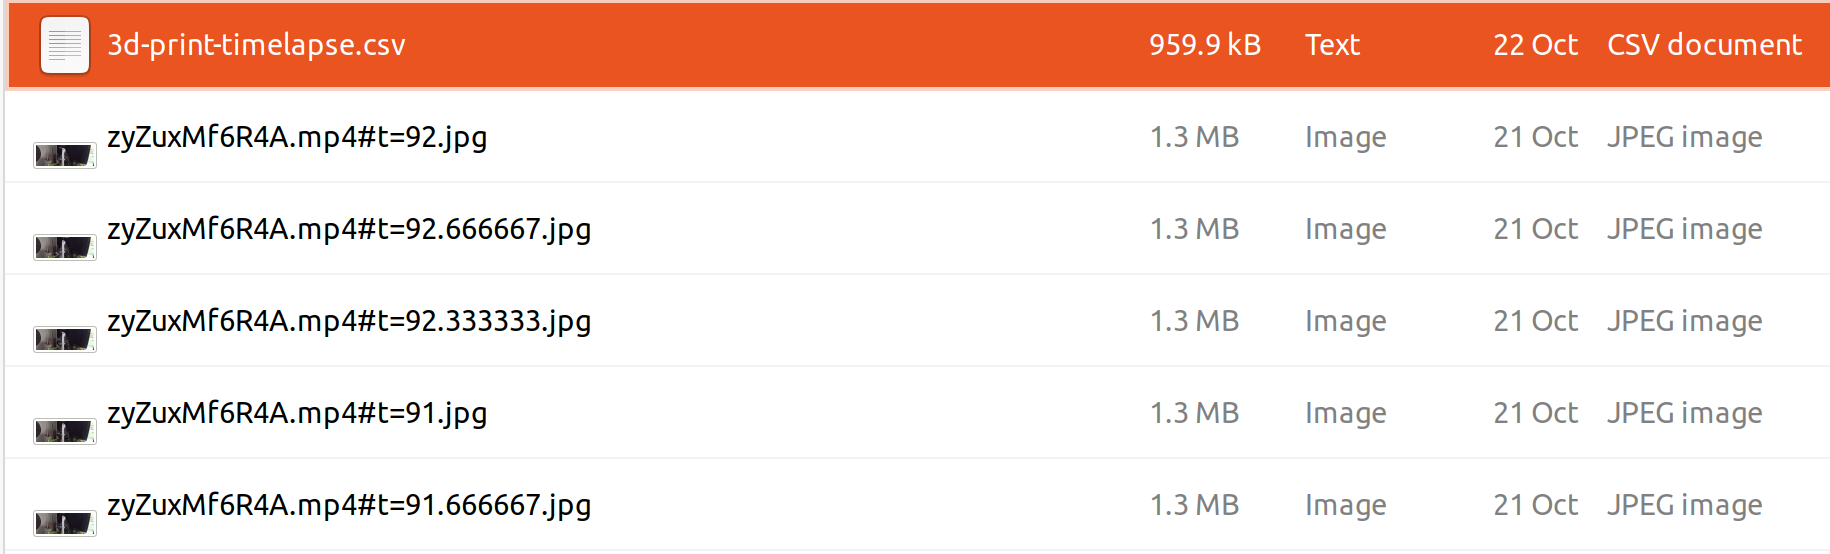
- 67 print time lapse videos, sampled at 3 frames per second
- 6,248 images viewed
- 9,004 bounding boxes drawn on 3,215 images, average 3 boxes per image.
- 8 hours, split over a few days. I caught up on podcasts I've been neglecting without a morning commute.
Write Annotation Guidelines
While the task is still fresh in your mind, take the extra time to write clear guidelines (example below) to keep labels consistent and cover common edge cases. Feel free to use my instructions as a template for your own.
Bounding Box Annotation Guidelines
Concept
2-3 sentence introduction to the task/concept
This dataset contains timelapse videos of failed 3D print jobs. Images are in chronological order. Your task is to draw tight boxes around all recognizable pixels matching a print defect or object.
Labels
id, text name, written description of labels and edge cases, positive and negative examples
- Should labels start at 0 or 1?
- Is 0 reserved for background / unknown class?
0 background
1 nozzle
The print nozzle is a metal object that extrudes hot filament.
If the nozzle is partially occluded, draw a bounding box around the entirety of the object (including occluded pixels).
If the nozzle is entirely occluded, do not label.
2 raft
A "raft" is a thin outline surrounding the first few layers of a print.
If the raft is partially occluded (usually by the print), draw a bounding box around the entire raft.
3 print
The object(s) being printed. If multiple object or pieces are being printed, draw a bounding box around each distinct object.
4 adhesion
...
5 spaghetti
...
Guidelines
- Input format
- Label format
- 1 or multiple objects per frame?
- 1 or multiple boxes per object "instance"?
- Tight or loose boxes?
- Label reflections (mirrors, water)?
Train a Guidance Model with AutoML 🤖
AutoML (Automated Machine Learning) is a technique that falls under the "brute force" category of algorithms. Cloud-based AutoML platforms are an excellent tool for validating that your problem can and should be solved with Machine Learning.
Even if you plan to train a model, consider putting the AutoML model in front of customers first. Collect customer feedback early and incorporate this information into the custom model's development. An example of some insights...
- Customers were not sensitive to false positives (defect reported via SMS, but print was ok).
- Most customers appreciates visual updates on the print's progress, even if the detector was incorrect.
- Surprisingly, a few customers reported false positives elicited a sense of security.
I used Google Cloud AutoML Vision Edge (Object Detection), which I selected because:
- Supports model export to TensorFlow Lite, TensorFlow.js and ops compatible with Edge TPU, ARM, and NVIDIA hardware acceleration.
- Disclosure: I'm a Google Developer Expert 🤓
Export Dataset from VoTT
In your project's export settings, choose the CSV provider. Check "include images," save the configuration, and then export the data. If you're exporting thousands of images, this will take a few minutes. Take a break!

Inspect and Preprocess Data
AutoML Vision requires CSV data in the following format if two vertices are provided:
SET,gs://path/to/img,label,x_min,y_min,,,x_max,y_max
The coordinates must be relative to the image's size, falling in range [0, 1].
Code available in Github Gist
import pandas as pd

# load VoTT CSV export
# notice: coordinates are absolute
df = pd.read_csv('/path/to/vott-csv-export/{project name}-export.csv')
df.head()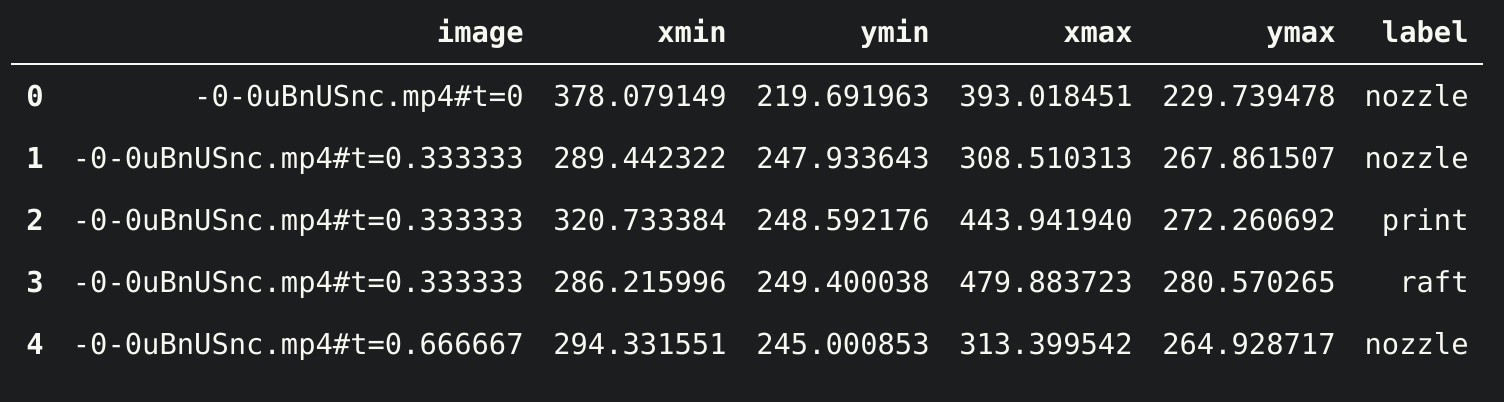
import cv2

base_path = '/path/to/vott-csv-export/'

LOG_INTERVAL=2000

# convert absolute coordinates to relative coordinates in [0, 1] range
for index, row in df.iterrows():
    if index % LOG_INTERVAL == 0:
        print(f'finished {index} / {len(df)}')
    filename = row['image_path'].split('/')[-1]
    img = cv2.imread(f'{base_path}{filename}')
    height, width, channels = img.shape
    df.at[index, 'x1_n'] = row['x1'] / width
    df.at[index, 'x2_n']= row['x2'] / width
    df.at[index, 'y1_n'] = row['y1'] / height
    df.at[index, 'y2_n'] = row['y2'] / height


# replace relative image paths with a Google Storage bucket path
df['set'] = 'UNASSIGNED'
df['gs_path'] = df['image'] + 'gs://bucket-name/path/to/upload'

# write CSV with columns expected by AutoML Vision
# the "none" columns are required for boxes defined by 2 vertices
df['none'] = ''
df.to_csv('/home/leigh/datasets/spaghetti/labeled/vott-csv-export/spaghetti_v1-normalized-export.csv',
    columns=['set', 'image_path', 'label', 'x1_n', 'y1_n', 'none', 'none', 'x2_n', 'y2_n', 'none', 'none'],
    index=False
    )
For additional information, refer to preparing your training data.
Upload Data
Upload the data to a Google Cloud Storage bucket. Note: If you're creating a new bucket, AutoML Vision exports in later steps require the destination bucket to be in the us-central-1 region.
- New to GCP? Follow the steps in Before you Begin to setup a project and authenticate.
- Install gsutil
gsutil rsync -r /path/to/vott-csv-export gs://your-bucket-name/vott-csv-export/
Import Data to AutoML Vision
- Open the AutoML Vision Datasets browser in GCP's console.
- Create a new dataset. In the import tab, select your CSV file from the Storage bucket.
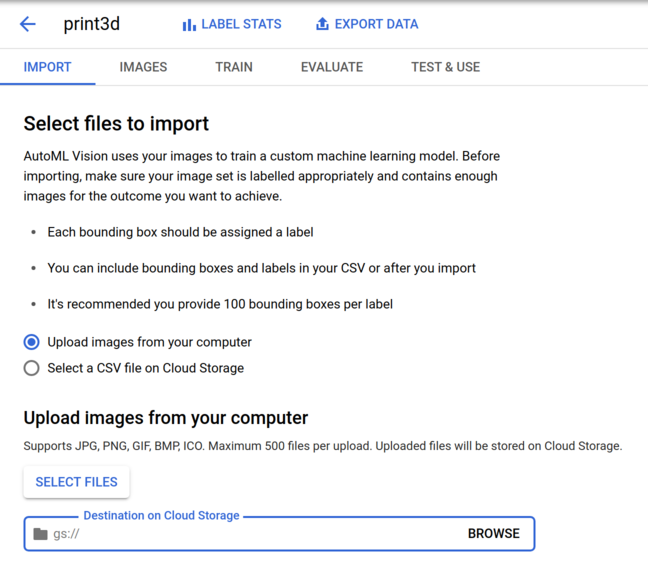
Take a break while the data imports! 👏
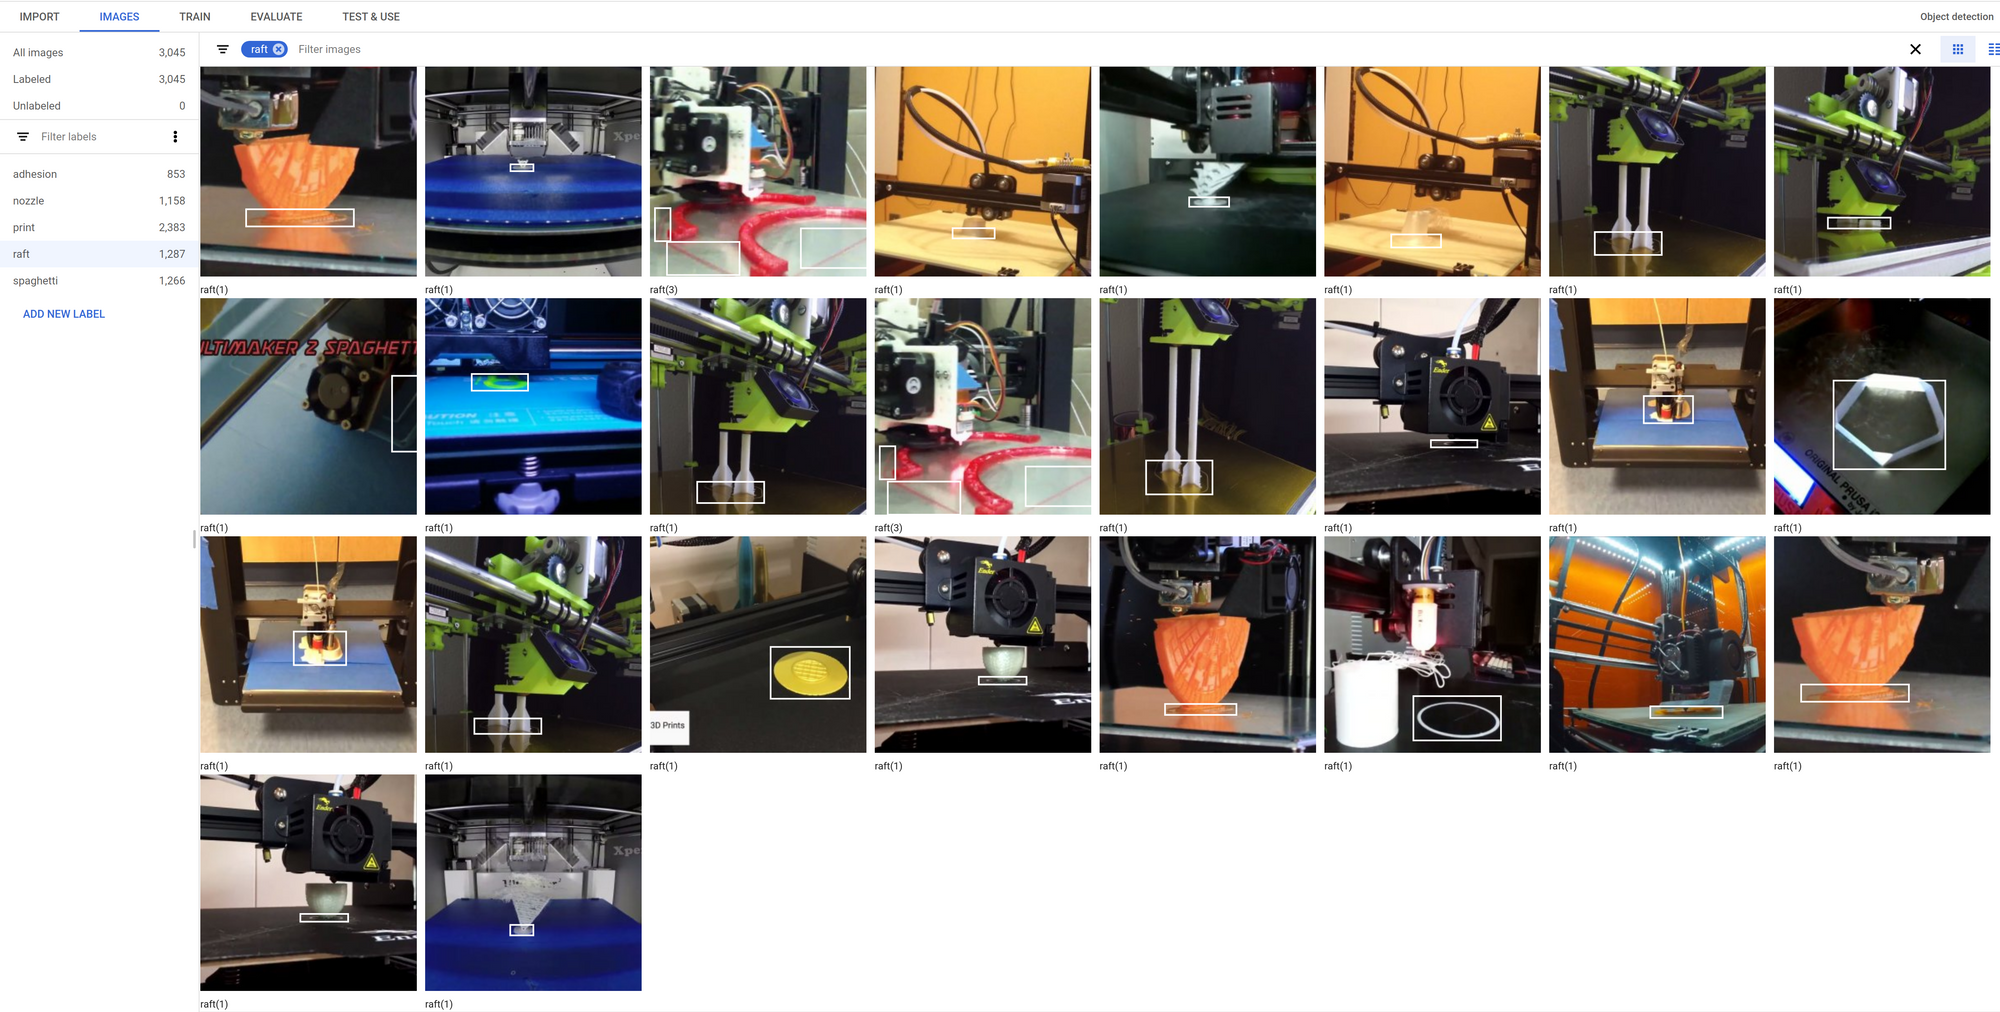
Before you train, sanity-check the imported data and verify labels are correct.
Train Model
AutoML's price system is based on node hours, which is not the same as "wall clock" or elapsed time. A critique I have is that pricing a training job in advance requires some additional effort.
AutoML Vision pricing (USD prices reflected below) varies by feature, with different pricing schedules for:
- Cloud-hosted classification & object detection - $3.15 / node hour, $75.6 / 24 hours
- Edge (classification) - $4.95 / node hour, $118.80 / 24 hours
- Edge (object detection) - $18.00/ node hour, $432 / 24 hours
If these prices are outside of your project's budget, I will cover how I train models with TensorFlow's Object Detection API in a future post. Follow or subscribe to my newsletter to be notified on publication.
For this particular problem (detecting 3D print defects), I saw reasonable results using the recommended training time (24 node hours) for my dataset size. Drilling down into individual labels, "nozzle" detection performed significantly worse compared to the rest.
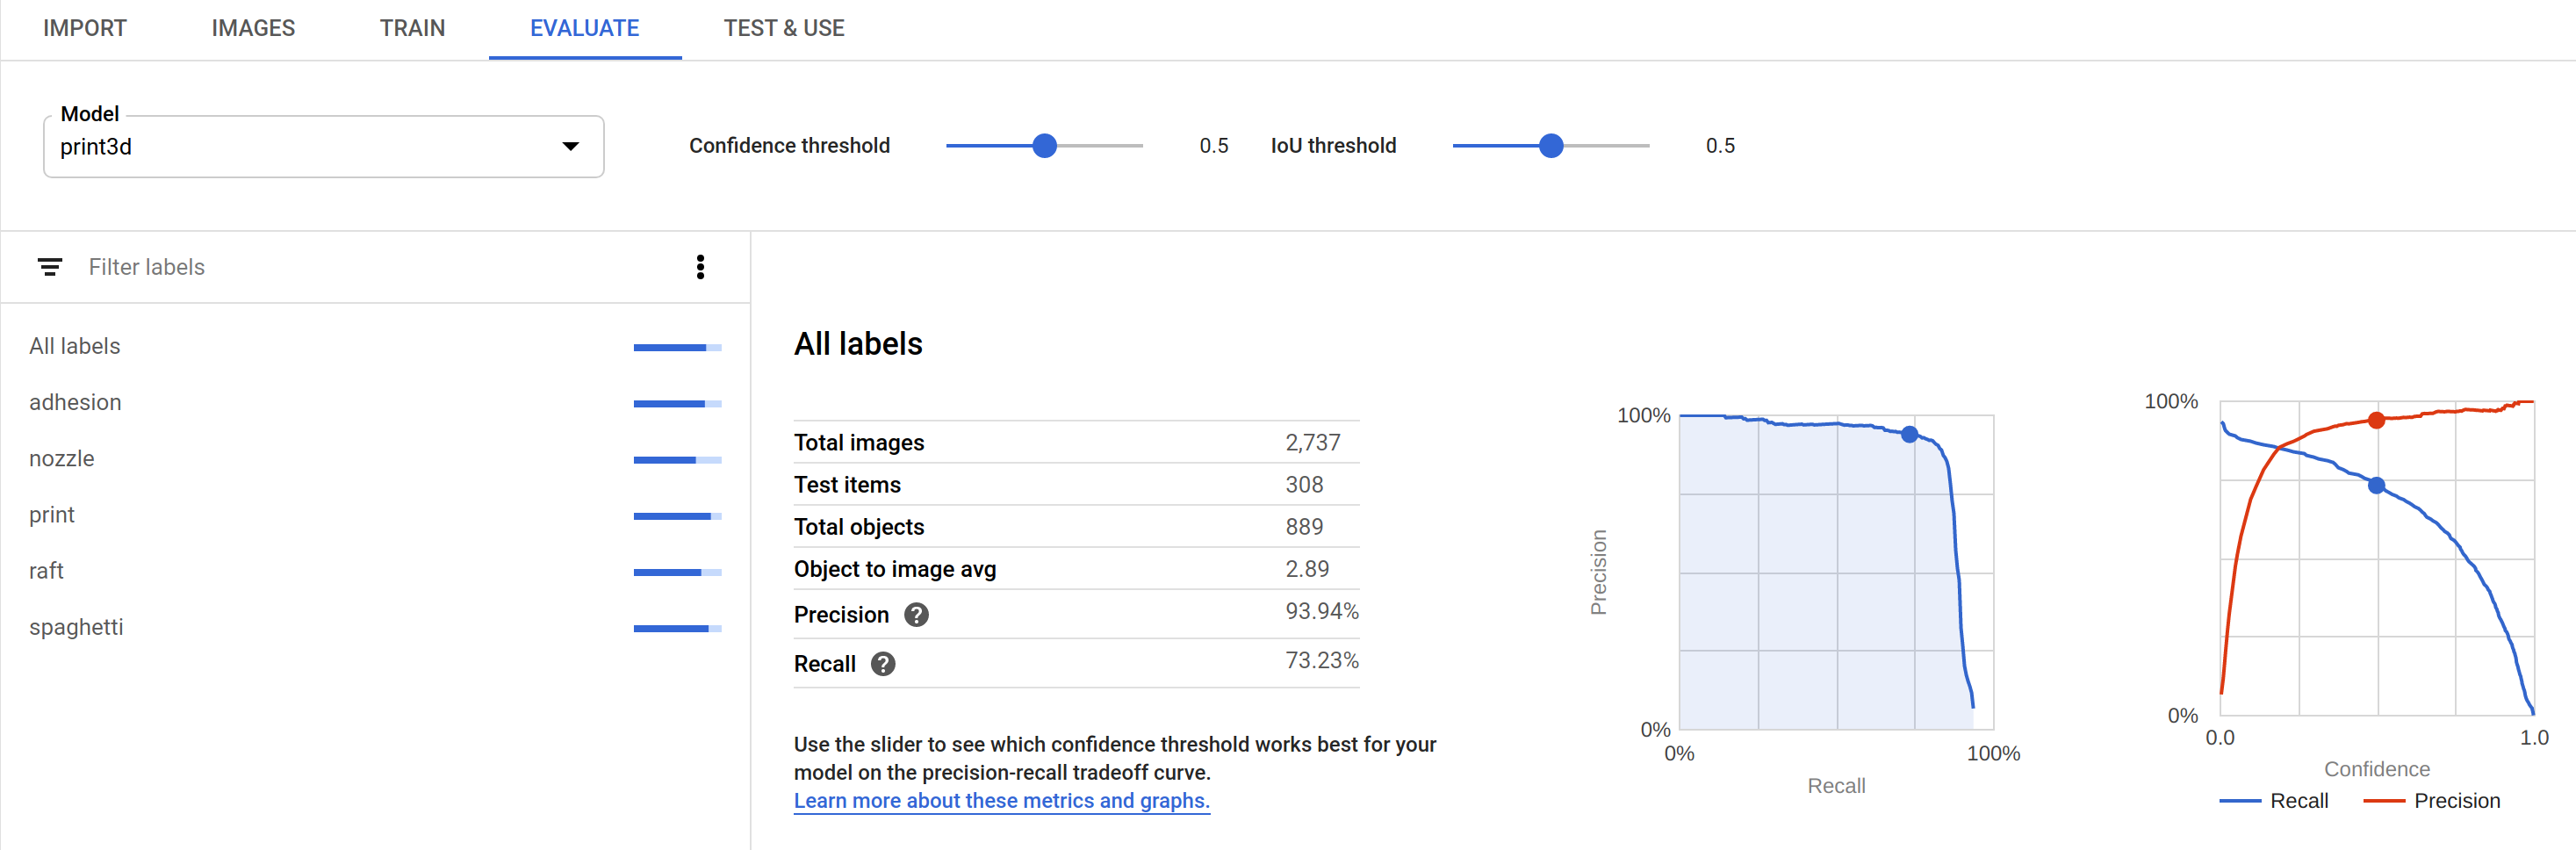
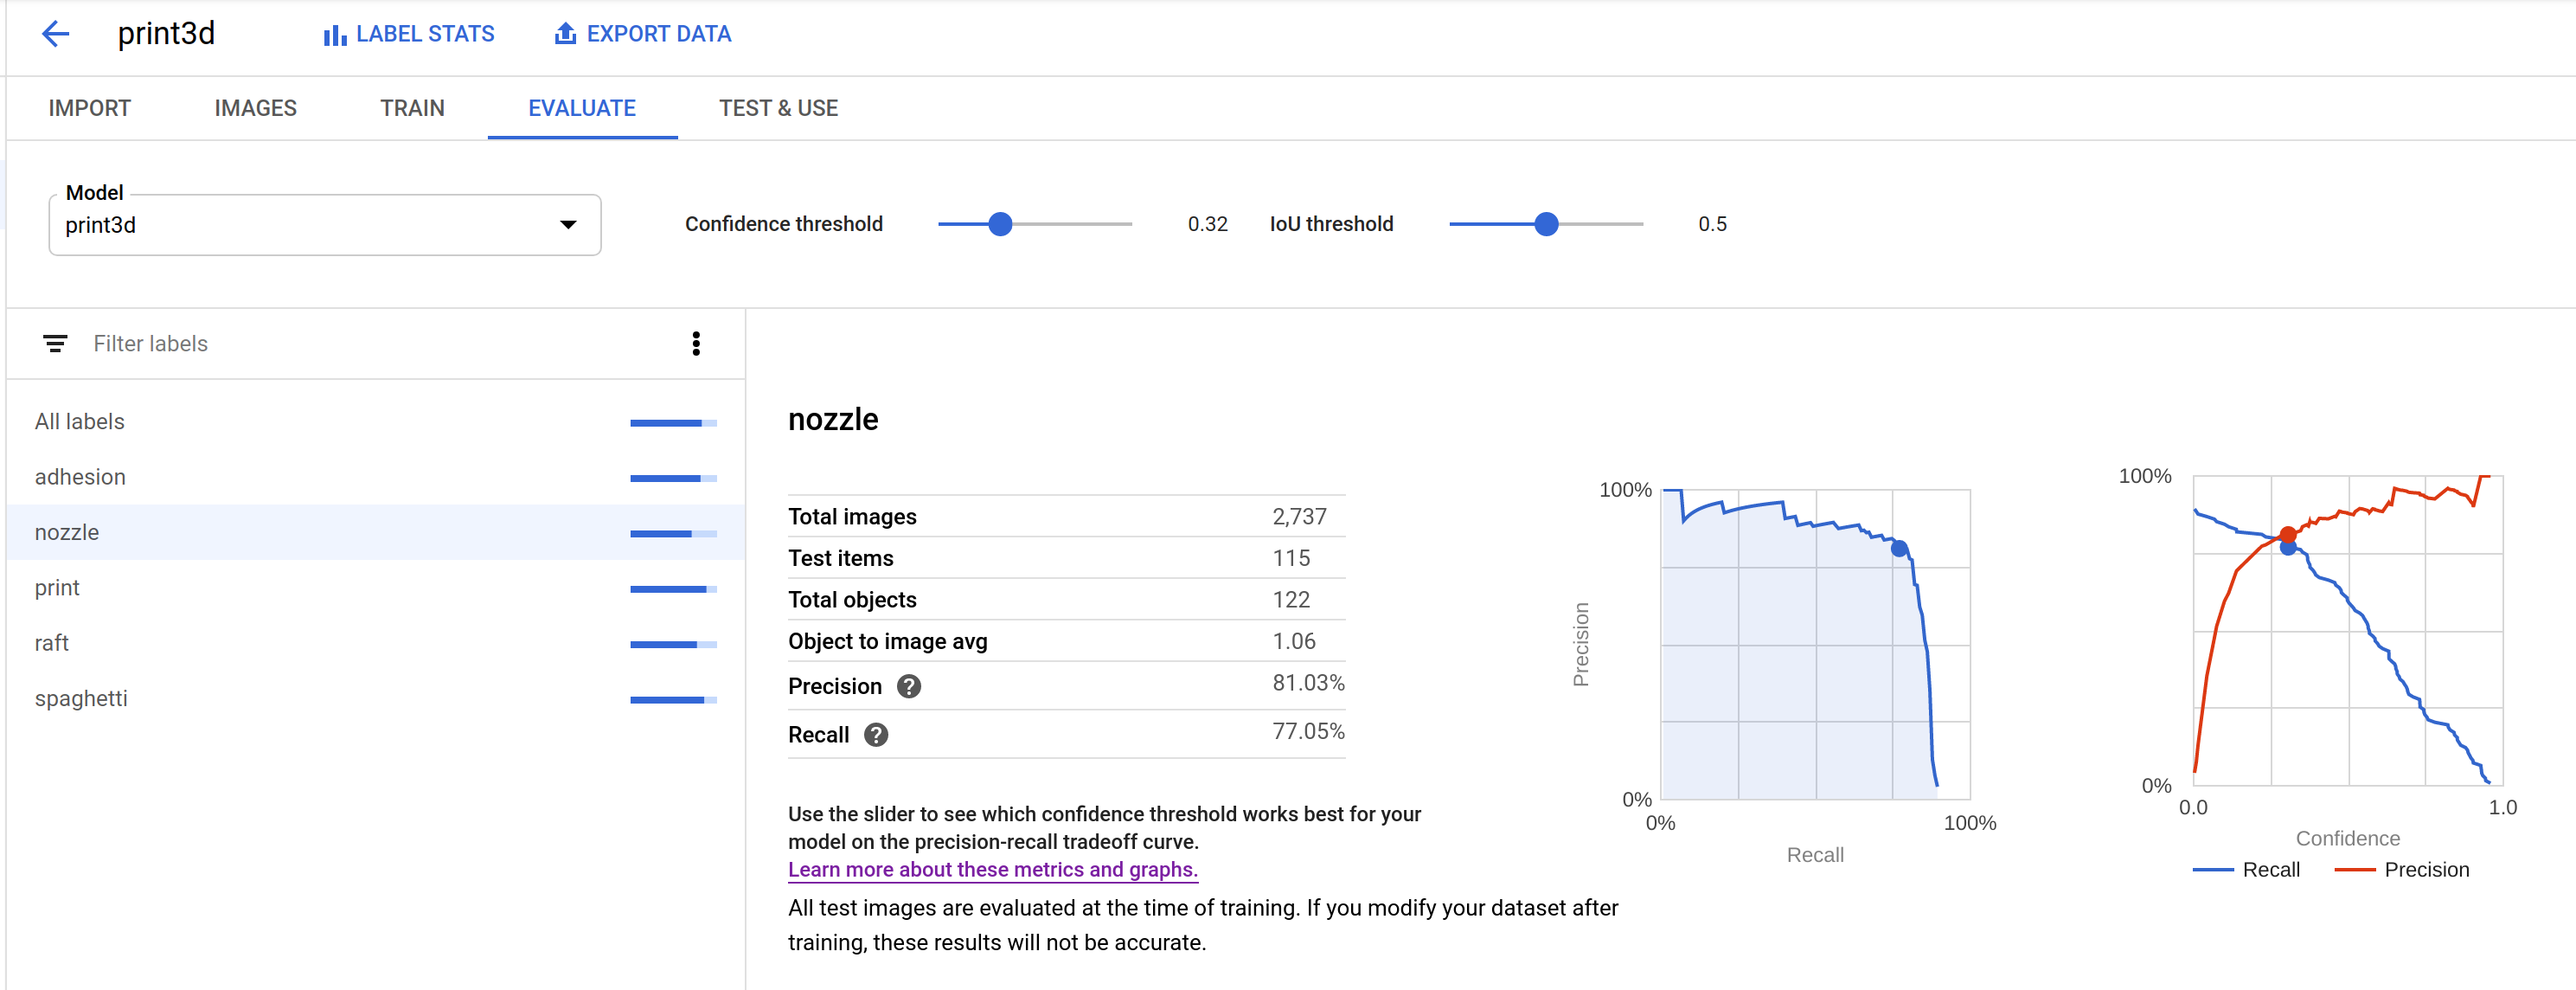
On closer inspection, I could see that a high false positive rate significantly impacted the model's precision score. Precision is the sum of true positive / (true positive + false positive). I was thrilled to discover a number of examples where I had failed to label nozzles in ground truth data.
🤯 Even though I had gotten sloppy during the first pass of labeling, the guidance model was already good enough to catch these mistakes. Wow! If I had to manually label the entirety of this data, it would be riddled with errors.

Automate VoTT Labeling with TensorFlow.js 🤖
The following section will show you how to use a custom TensorFlow.js model to suggest bounding boxes with VoTT's "Active Learning" feature.
The "Active Learning" uses a TensorFlow.js model to perform an inference pass over a frame, apply non-max suppression, and draw the best box proposal per detected object.
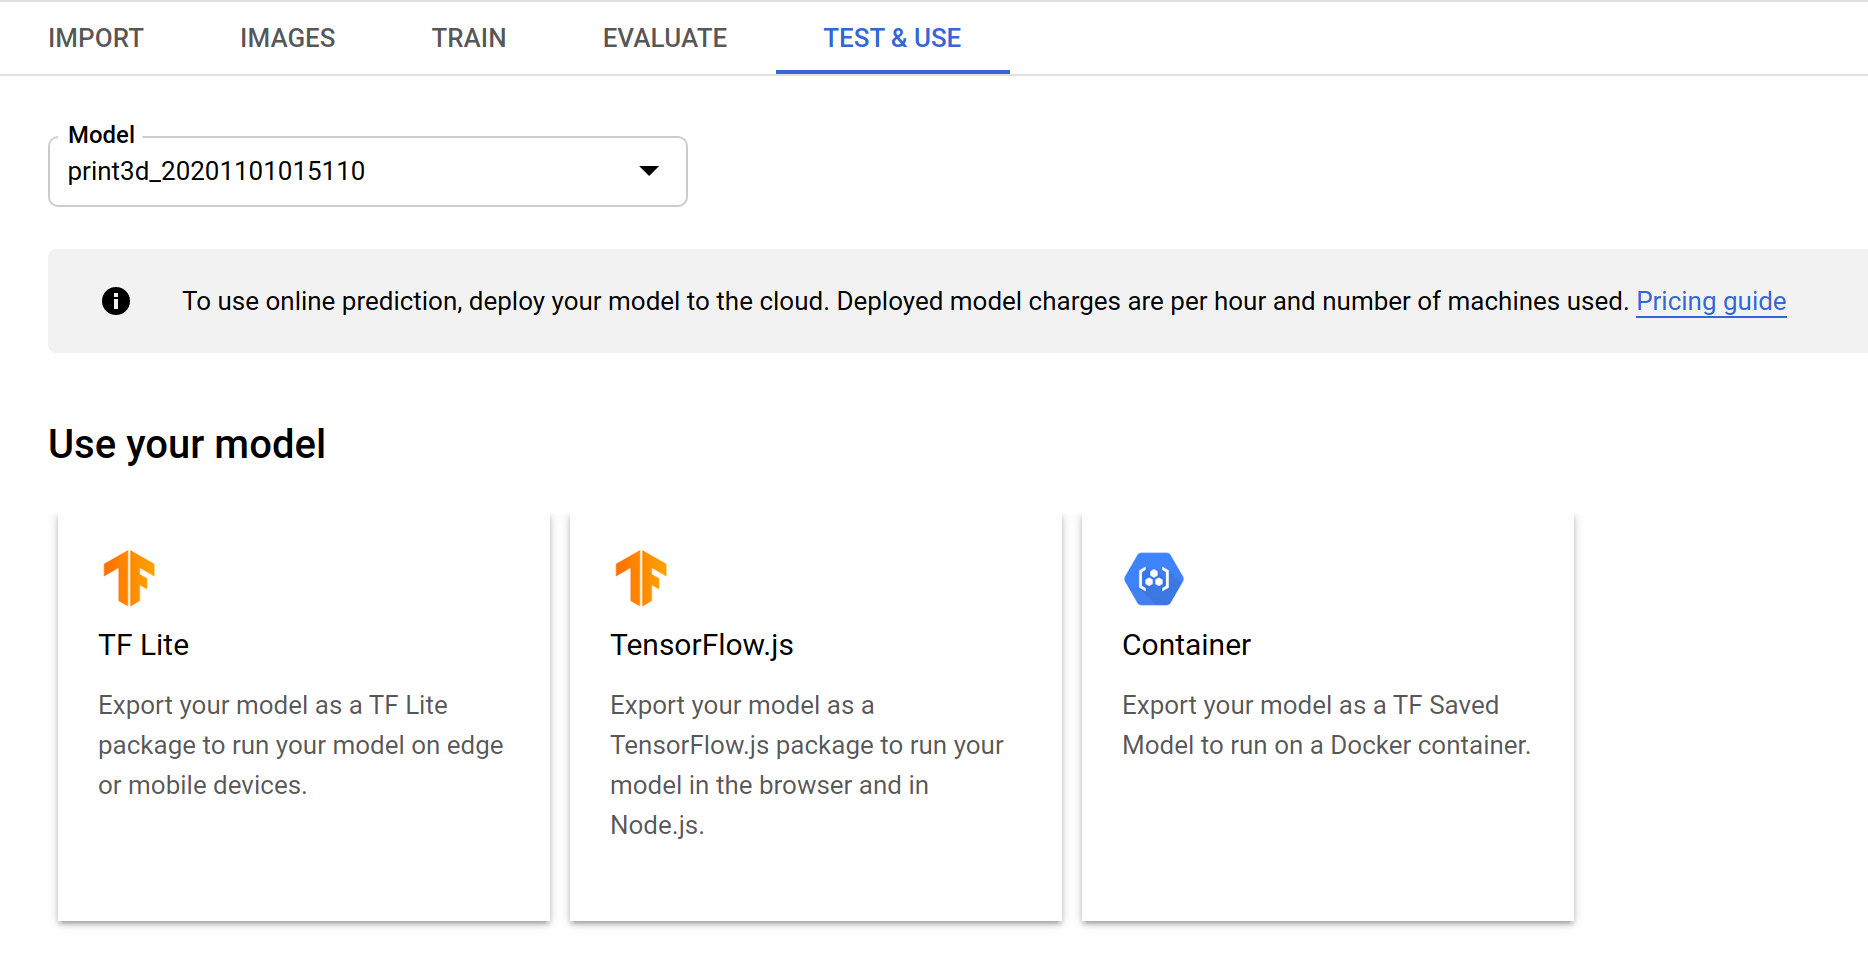
Export TensorFlow.js Model
After model training completes, you can export a TensorFlow.js package in the "Test & Use" tab. The model will export to a Storage bucket (the destination bucket must be in the us-central-1 region).
Create classes.json file
I fixed this manually. AutoML Vision Edge exports a new-line delimited label file. The format required by VoTT is below. Label index MUST start at 1!
[{"id":1,"displayName":"nozzle"}, ... ]Patch VoTT to fix TensorFlow 1.x -> 2.x bugs
VoTT ships with v1 of @tensorflow/tfjs. The AutoML Vision Edge model uses ops (e.g. AddV2) that require a more recent version. I fixed a few minor issues with the following patch:
- Model expects float32 input
- Use newer tf.image.nonMaxSupressionAsync() fn
diff --git a/src/providers/activeLearning/objectDetection.ts b/src/providers/activeLearning/objectDetection.ts
index 196db45..a8dff06 100755
--- a/src/providers/activeLearning/objectDetection.ts
+++ b/src/providers/activeLearning/objectDetection.ts
@@ -151,6 +151,8 @@ export class ObjectDetection {
         const batched = tf.tidy(() => {
             if (!(img instanceof tf.Tensor)) {
                 img = tf.browser.fromPixels(img);
+                // model requires float32 input
+                img = tf.cast(img, 'float32');
             }
             // Reshape to a single-element batch so we can pass it to executeAsync.
             return img.expandDims(0);
@@ -166,7 +168,8 @@ export class ObjectDetection {
         const result = await this.model.executeAsync(batched) as tf.Tensor[];

         const scores = result[0].dataSync() as Float32Array;
-        const boxes = result[1].dataSync() as Float32Array;
+        // tf.image.nonMaxSepressionAsync() expects tf.Tensor as input
+        const boxes = result[1].dataSync()

         // clean the webgl tensors
         batched.dispose();
@@ -177,10 +180,8 @@ export class ObjectDetection {
         const prevBackend = tf.getBackend();
         // run post process in cpu
         tf.setBackend("cpu");
-        const indexTensor = tf.tidy(() => {
-            const boxes2 = tf.tensor2d(boxes, [result[1].shape[1], result[1].shape[3]]);
-            return tf.image.nonMaxSuppression(boxes2, maxScores, maxNumBoxes, 0.5, 0.5);
-        });
+        const boxes2d = tf.tensor2d(boxes, [result[1].shape[0], result[1].shape[1]]);
+        const indexTensor = await tf.image.nonMaxSuppressionAsync(boxes2d, maxScores, maxNumBoxes, 0.5, 0.5);

         const indexes = indexTensor.dataSync() as Float32Array;
         indexTensor.dispose();
@@ -188,7 +189,9 @@ export class ObjectDetection {
         // restore previous backend
         tf.setBackend(prevBackend);

-        return this.buildDetectedObjects(width, height, boxes, maxScores, indexes, classes);
+        // _.buildDetectedObjects expects Float32Array input
+        const fboxes = boxes as Float32Array
+        return this.buildDetectedObjects(width, height, fboxes, maxScores, indexes, classes);
     }
Automatic Bounding Box Suggestions ✨
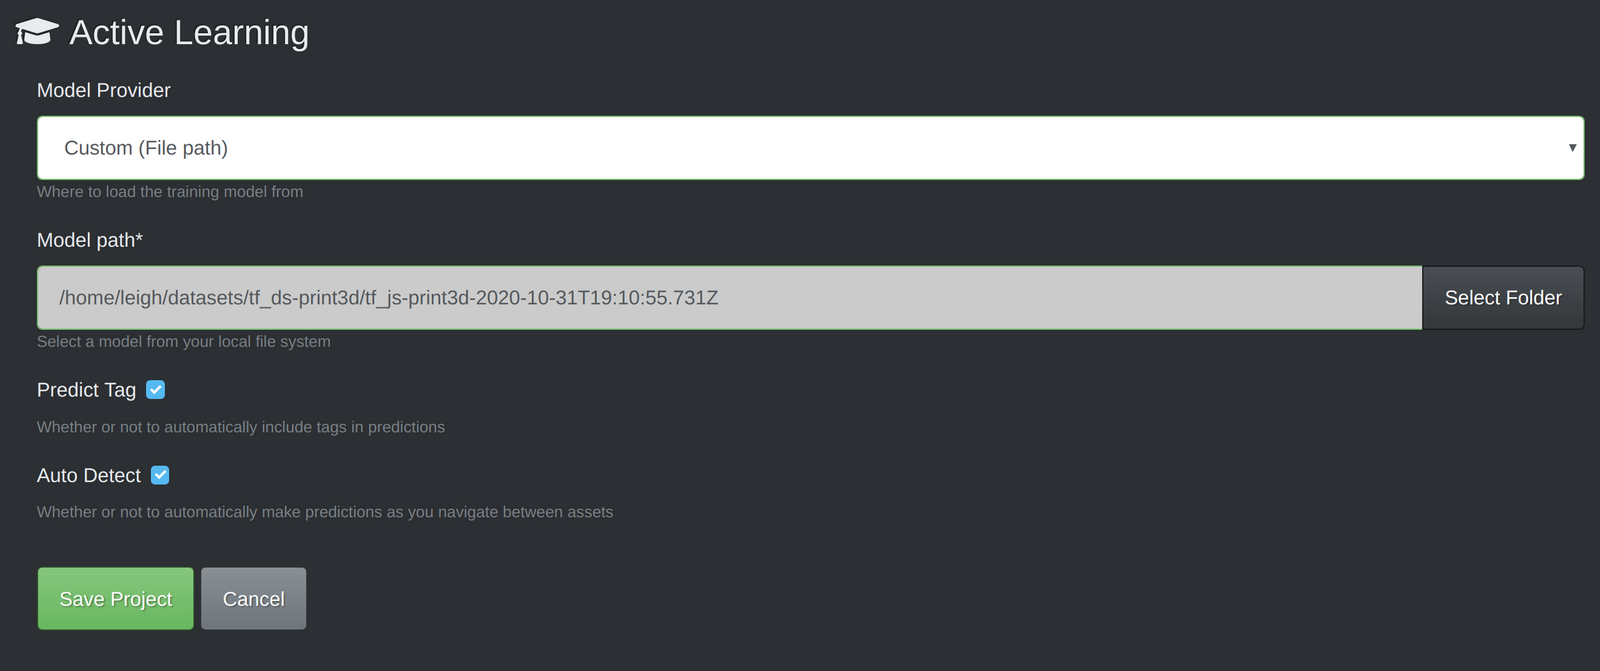
- Run
npm startafter patching VoTT - In the "Active Learning" tab, configure "Model Path" to point to your TensorFlow.js export. I recommend enabling the "auto detect" feature, otherwise you'll have to manually press ctrl/cmd+d to perform a detection pass on each frame.
Wrapping Up
You just learned how to leverage a few hours and a few hundred dollars into an automated workflow for bounding box annotation. As a bonus, the guidance model can be adequate for a prototype or even initial production run. I hope this saves you a bit of time/energy in your next object detection project!
AutoML products are expensive compared to other cloud offerings - but they're nowhere near as resource intensive as developing a comparable model from scratch, or even with weight transfer learning.
Are you currently solving problems using an object detector? Tell me more about the concept and the approach you're taking in the comments below.
Subscribe to my newsletter @ bitsy.ai f you want to receive more tips and detailed write-ups of ML applications for Raspberry Pi, Arduino, and other small devices. I'm currently building a privacy-first 3D print monitoring plugin for Octoprint.